
Have you ever run into a situation where you need to have an email message delivered at a specific time rather than immediately? If so, here’s a look at how to do it if you’re using either Outlook 2013 or 2016.
Delay Individual Message Delivery
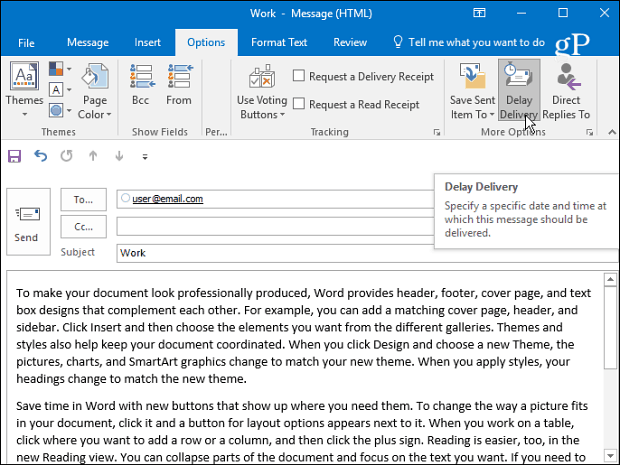
Select New Email to start composing your new email message and then click the Options tab on the ribbon and then Delay Delivery.
Then in the Properties windows under the Delivery options section check Do not deliver before and then plug in a future date and time to delay delivery and then close out of the window and then send the message.

Delay Delivery of All Messages
If you want to delay the delivery of all messages, you can have them held in the Outbox until the time you want them to go out by creating a rule. Click the File tab and then Manage Rules & Alerts.

When the Rules Wizard starts up, select Apply rule on messages I send under the Start from a Blank Rule section and click Next.

On the next screen check off any options you want if you have any – if not, don’t check any boxes and just click Next and then Yes to the confirmation dialog.

Next, in the Select actions column check defer delivery by a number of minutes. Then below that click the “a number of” link and then enter the number of minutes you want to defer the delivery for. Note that you can delay delivery for up to 120 minutes.

In the next step check off any exceptions that you want and enter the values for any fields that pop up after checking an exception. For example, in the shot below I want to make sure that high priority messages get through and I checked “except if it is marked as importance” and then specified the value to High.

Finally, type in a name for your rule under Step 1, check Turn on this rule under step 2, and before continuing, double check the rule description in the Step 3 box and verify it’s what you want. If it’s not, you can still go back and make changes.
Note: If you’re using multiple email accounts in Outlook, also check Create this rule on all accounts.

That’s it. Your new rule will appear in the Rules and Alerts screen and you are able to edit it later if you need to.

If you’re using previous versions of Outlook check out one of the articles linked below:
- Defer or Schedule Delivery of Outlook 2010 Email Items
- Delay or Schedule Delivery of Email using Outlook 2007
Dana
March 31, 2017 at 2:03 pm
I have Outlook 2016 as a part of Microsoft Office which I purchased not so long ago. BUT! I don’t have an “Options” tab … why is mine different?
Warrick
July 14, 2017 at 3:10 pm
Hey Dana, when you click reply, find the tags section and click the expand button in the bottom right-hand corner of the section and then you will see what’s in the article.