How to Use Your Webcam on Windows 10, Linux and macOS
Looking for some inspiration to use your laptop’s built-in camera? Check out this article.
The vast majority of laptops sold within the past decade include a webcam. Apart from using it as a tool to communicate with friends over Skype or take the occasional selfie, what else can you use your computer’s webcam for? Let’s find out.
Webcam Installation and Setup in Windows 10
Depending on the type of computer you have, you might need to set up your webcam before starting to use it. A laptop’s webcam will normally come configured out of the box. If you are using a desktop computer, the webcam hardware might not be plug-and-play. In general, you will need to have your driver software available, which will be used to recognize the webcam. Windows 10 releases tend to break older software, so I would advise checking the manufacturer’s website for updated webcam firmware and updated webcam drivers/software before attempting installation from the driver disc. The software setup might offer the option to get the latest driver, so make sure to look for that option during setup.
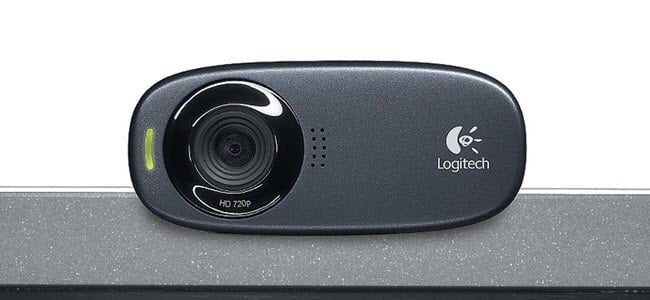
For the example below, I found my webcam software on the Logitech Downloads site. Just search for your Webcam model to find all the available software for your specific OS version.
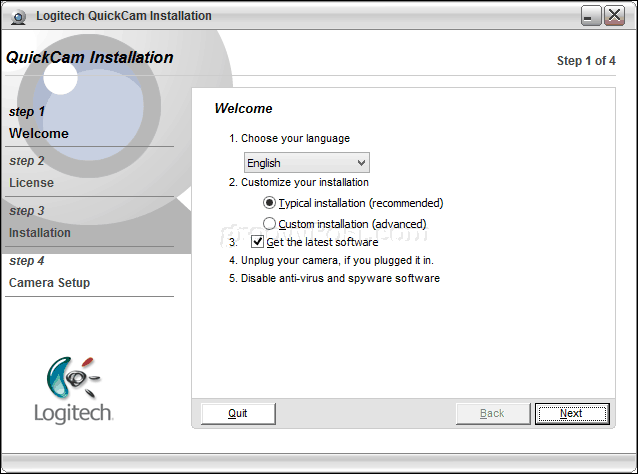
It’s fairly typical for manufacturers to bundle additional software with their webcam drivers. Generally speaking, you can get by with just the driver software, especially if you already have a third-party or native Windows 10 application you plan on using with your webcam. The manufacturer’s bundled software may enable advanced features that can’t be accessed from a generic webcam application. Or it might be complete bloatware. If given the option to forgo the installation of additional features, you might want to save yourself the disk space and go with just the drivers at first. If the experience is lacking, you can go ahead and install the additional bundled software later.
After installing the software, connect the webcam when prompted, then wait while it is detected.

Once you have your webcam up and running, you can configure and tweak settings using the manufacturer’s software. The picture quality from your webcam will be determined by certain factors, such as the room or environment you are in. Turning on the light in your room could improve brightness and contrast. Opening an application with a light background can also serve as a makeshift flash in a pinch. Your webcam software might include optional settings to enhance lightings, such as night mode and backlight.
Audio quality can also be determined by the type of webcam you have. The webcam software might also include additional technology for canceling echo and suppressing background noise. Investing in a dedicated headset can help, too.

All setup? Great! Now let’s put your webcam to use.
How to Take a Photo for Your User Account Using Your Webcam (Windows, macOS, and Linux)
One of the mundane activities you can use your webcam for in Windows 10 is to capture a picture for your user account. To do that, click Start > Settings > Accounts > Your info, scroll down, then click the camera button. Tap the camera icon to capture a new picture for your profile.

macOS users can do the same from within Settings > Accounts > click your profile picture > choose Camera > click Take Photo.

Depending on the distribution of Linux you are using, your options might be different. On Ubuntu Linux, I was able to find similar options in Settings > User Accounts. Click the profile icon, then click Take a Photo.

Click the camera icon to capture a photo for your login profile.

How to Record or Stream Video Using Your Webcam
Many users are now participating in live streams, thanks to popular social networks such as YouTube and Facebook. Whether it’s to communicate with a large audience of followers, start a video blog, perform your first audition or unbox a product, your webcam makes the process easy using various free software and online services.
I recommend social media platforms such as Facebook Live and YouTube Live Streaming for the least complicated and mainstream options. YouTube requires some pre-requisite tasks. You will need to verify your channel. You’ll also need to make sure you have no live stream restrictions in the last 90 days. For me, the process was quick and easy.

Once you have that out of the way, you can go to the Creator Studio tools on your YouTube channel, click the Live Streaming tab, click Live Stream, then Get Started to begin.

A URL will be generated for your live stream page, which you can share with your audience elsewhere.

Download, Install and Configure Encoding Software
Some hardware and devices come ready to stream to YouTube live out of the box. If not, then you’ll need to download and install encoding software before you begin live streaming. YouTube lists several applications you can use, most of which support Windows and Mac. The only Linux option I came across – listed on the same page — is the Open Broadcast Software from OBS Studio. Not only does it work on Linux, but you can download versions for Windows and Mac, too. It’s also easy to set up and use.

During setup, you will be prompted to enter your live stream key, which you can find on your YouTube channel page.

Proceed to enter it, then complete the rest of the setup. Remember to keep it secret since anyone can use it to broadcast from your channel.

The next step is to enable your Stream in the OBS Studio software. Click Start Streaming.

Click the add (+) button within sources, then choose the Video Capture Device.

Select the Create new radio button, give your video capture a name, then click OK.

Click in the Device list box, then choose your front or back-facing camera, depending on what you plan on streaming. You should see a preview of your stream. Click OK to return to the main interface.

You can use the anchors to resize the video stream.

To check if your live stream is working, go back to your live stream page on YouTube.

When your audience goes to your page on any device, they can watch you in real-time.

You can end the live stream from within the OBS Studio software by clicking Stop Streaming.

OBS Studio supports live streaming to a variety of platforms. When you want to change services, click the Settings button, select the Stream tab, then click in the Service list box. There you can choose from a long list of services.

How to Record Video with OneNote or Movie Maker or QuickTime
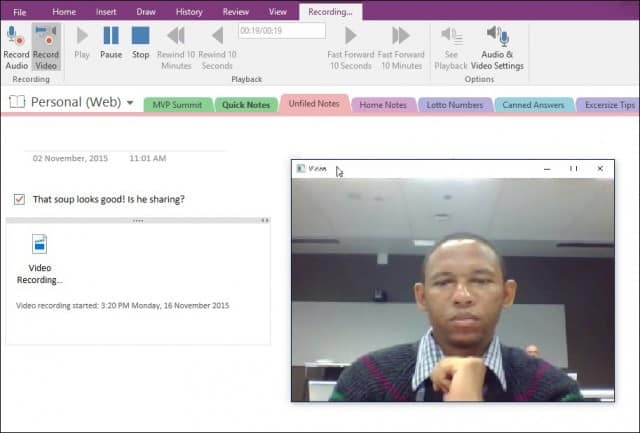
Windows users can download free software such as OneNote, which you can use to record video, too. Users will need to download the desktop version of OneNote. In OneNote, select the Insert tab, then click Record video. This will activate a small video capture application. You can then insert your recorded video in your notes. This is especially useful for students or meetings where there is an overwhelming amount of information being shared.
Another application you can use with your webcam is Movie Maker, which is included as part of the defunct Windows Essentials suite; still available for download as of this writing. In Movie Maker, select the Home tab, then click Webcam video.

Click the record button, then stop when you are done. Save the video, which you can then incorporate into a project or upload to Facebook, YouTube, or Vimeo.

Apple’s QuickTime X, which comes bundled with macOS, can record video using the Facetime camera. Launch QuickTime X, click File > New Movie Recording.

Click the Record button.

Photo Booth and Photo Booth Alternatives for Windows and Linux
For years, Mac users have enjoyed using the built-in webcam in the company’s popular notebook computers, using bundled software called Photo Booth. Photo Booth makes it easy to apply various fun and gimmicky effects to your photos you can save or share. Launch the Photo Booth software, then tap the camera button.

Select your photo, then click Effects.

Photo Booth includes some fun and whimsical effects; browse through the gallery, then choose one. I like the effects that let you insert yourself in a European country or make birds fly around your head.

Photo Booth comes bundled with macOS. If you don’t have a Mac, you’ll have to use something else.
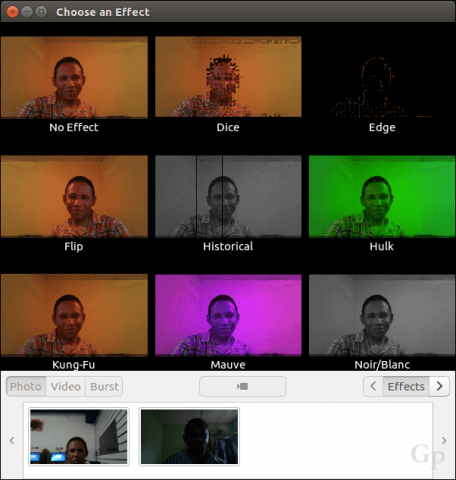
Linux users can use similar software called Cheese. Cheese lets you capture photos or videos and apply fun effects just like Photo Booth.

Users can also enable settings such as burst mode or a countdown timer.
Windows users have some choices; the first place I would check is the bundled software included with your webcam. The included software might not meet Apple’s Photo Booth standards but could be just as useful for capturing photos, audio, and video. My Logitech webcam includes an application for creating live-action avatars using my image applied to my facial movement.

If you use a Windows Tablet like the Microsoft Surface, the built-in webcam can capture selfies, apply filters, and share on the free Instagram app for Windows. Please note, this does not work on traditional laptop devices; the reason why – I haven’t got a clue.
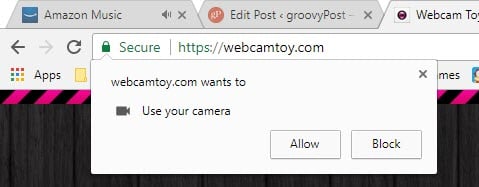
There are also a few free camera web apps too. Just be wary about allowing website access to your webcam—make sure it’s a website you trust.
FotoFriend Webcam effects is a free online service you can check out if you don’t want to install the software. The service includes over 55 effects. Once you snap your photos, you can keep them private or publish them to an online gallery. The big drawback of FotoFriend is that it uses Adobe Flash, one of the Apps and Services You Should Stop Using in 2017.

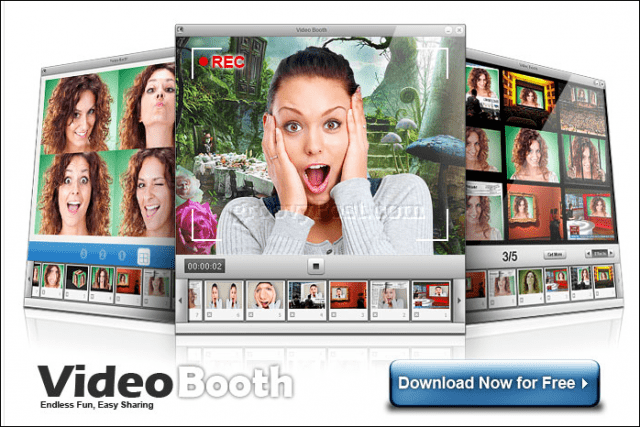
For a desktop application, the closest to Photo Booth I have used is the curiously named Video Booth – hmm, I wonder where they got the idea for that name. If you need a free webcam app that does a lot, this is probably it. You can do the following:
- Capture photos and video.
- Utilize a collection of fun and crazy visual effects and backgrounds.
- Photo burst.
- Upload photos and videos to popular networks.
Security Tips to Protect Your Privacy When Using Your Web Cam
Privacy is an important part of using your webcam. Even for someone like the founder of Facebook, a webcam can be seen as a possible threat to privacy or a means for espionage. For many users, a common way to avoid or prevent your webcam from being used to spy on you is by covering it with a piece of electrical tape or a strip of paper. If you are working with sensitive information or using your computer in your home’s private areas, you can always disable your webcam. Here is how you do that.
In Windows 10, click Start > Settings > Privacy, select the Camera tab, then toggle off Let apps use my camera hardware. You can individually modify which applications can have access to the webcam.

If you don’t want the camera to ever be in use, press Windows key + X, then click Device Manager. Expand Imaging devices, right-click the device, then click Disable. If you are using a dedicated webcam, the next easy option is to unplug it.

For Mac users, your options are limited. The best option I could find was techslaves.org iSight Disabler. You might have to settle for the manual method of using electrical tape—hey, it works for Mark Zuckerberg.

So, that’s a look at some of the basic things you can do with your webcam. The hardest part of the setup is finding decent software. The ones I mentioned might not be the best choices, so let me know what you use in the comments section. Overall, Photo Booth for macOS is probably the best outbox experience users can find. Windows users will have to do a little research to find the perfect fit.
Looking for more tricks for your webcam? Modern Windows 10 devices such as the Surface Book or Surface Pro 4 include biometric recognition technology called Windows Hello. Windows Hello can be used as a method of authentication by scanning your retina. If you don’t own a supported Windows 10 device, you can purchase a third-party camera such as Intel’s Realsense, which lets you use Windows Hello. Windows Hello can also be used to authenticate purchases online in the Microsoft Edge web browser.